
One of the most difficult aspects to exploring the outdoors is figuring out where you want to go. Some trips will be purely exploratory where you start somewhere and have no idea where you’ll end up for camp that night, other trips will be a more coordinated effort with a destination in mind either being an exit point for a trail or a campsite at a lake. The first example can be done more spontaneously, but not without preparation. The second will require a lot of planning ahead of time to check and create the route that will suit you, your vehicle, and the size of the group that you are with best. The last thing that you want on a coordinated trip is to not know where you are going as it creates additional stress that is the antithesis of what it means to be exploring. For my trip planning, I almost exclusively use Gaia GPS for researching, routing and tracking my adventures. I will go through some tips and tricks that I have learned along the way, along with some of the features of Gaia GPS.

Where to start for your adventure
This can be a tough one. Weather, terrain, where you live, timeframe… These all play a factor in choosing a location. Regardless, I will usually search for campsites on public land because they’re usually in great locations, they don’t require reservations, and they’re FREE! To do that, I will switch over to my USFS 2016 layer on Gaia that will show me all of the public land at my disposal. From there it’s deciding on what terrain and destination works best for my weekend trip. Living in the Bay Area, the western slopes of the Sierra Nevadas is close so it’s a pretty good go-to for a quick weekend trip. My advice for trying to find new areas to camp where you live is to network with others using either social media (local Facebook groups), websites such as Expedition Portal, or other resources such as The Guide to California Backroads and 4x4 Trails. From there you can use the Gaia app to research your route and plan your trip.
How to get to your campsite: Creating a route
One of the benefits to the Gaia suite is the ability to create routes within the app or the website to show you the way when you’re on the trail. The biggest benefit to this for me is that you can plan your trip so that the distance between two waypoints will allow you to have enough time at the end of the day to find the right campsite and get things set up before the sun goes down. And for longer trips, allow you to calculate fuel needs for your adventure.

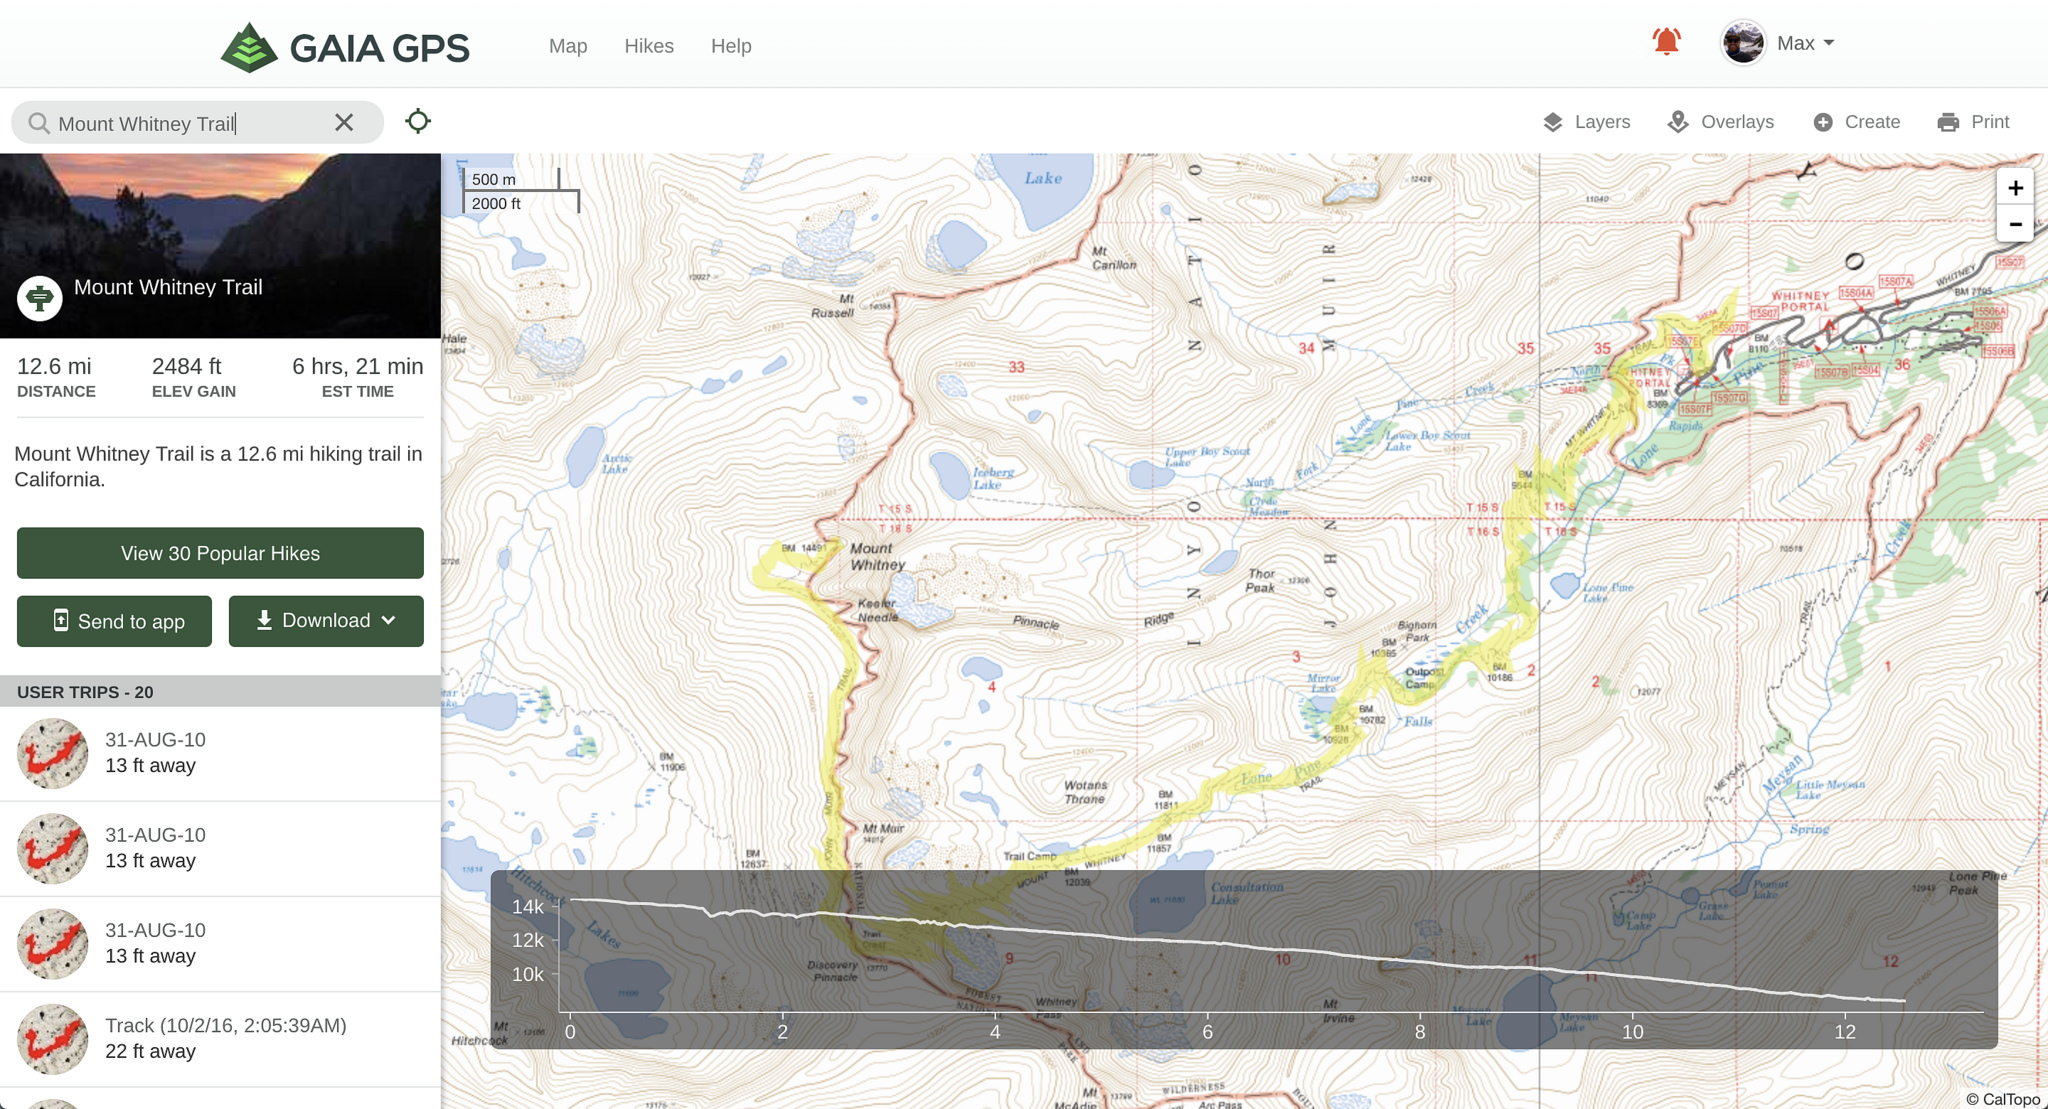
Using the "create a route" tool on the Gaia GPS website
The Gaia GPS routing software allows you to select points along a map to create a route between destinations. The selection option for mode of transportation are hiking, biking, 4wd and as the crow flies. They will allow you to select different classification of roads, paths, and trails for your routes. The 4wd selection will limit you to vehicle designated roads and not pedestrian or single track trails. Start with your first point and then select another point further down your desired route. The line should automatically conform to the road line. One tip that I have learned is when creating a route, you will need to have one of the Gaia GPS created layers in your layer selection palette as the routing portion of the software uses those maps to determine the fit line for the route. If you were just to rely on one of the “third party” layers, the route lines may differ from the Gaia layer and when you click on a route and then another point the line won’t conform to the road, it will form a straight line between points. Look below the layer name to see who the map creators are and find one that matches your needs made by Gaia GPS. Then you can toggle between the Gaia and third party layers to make sure your route stays on track and conformed.
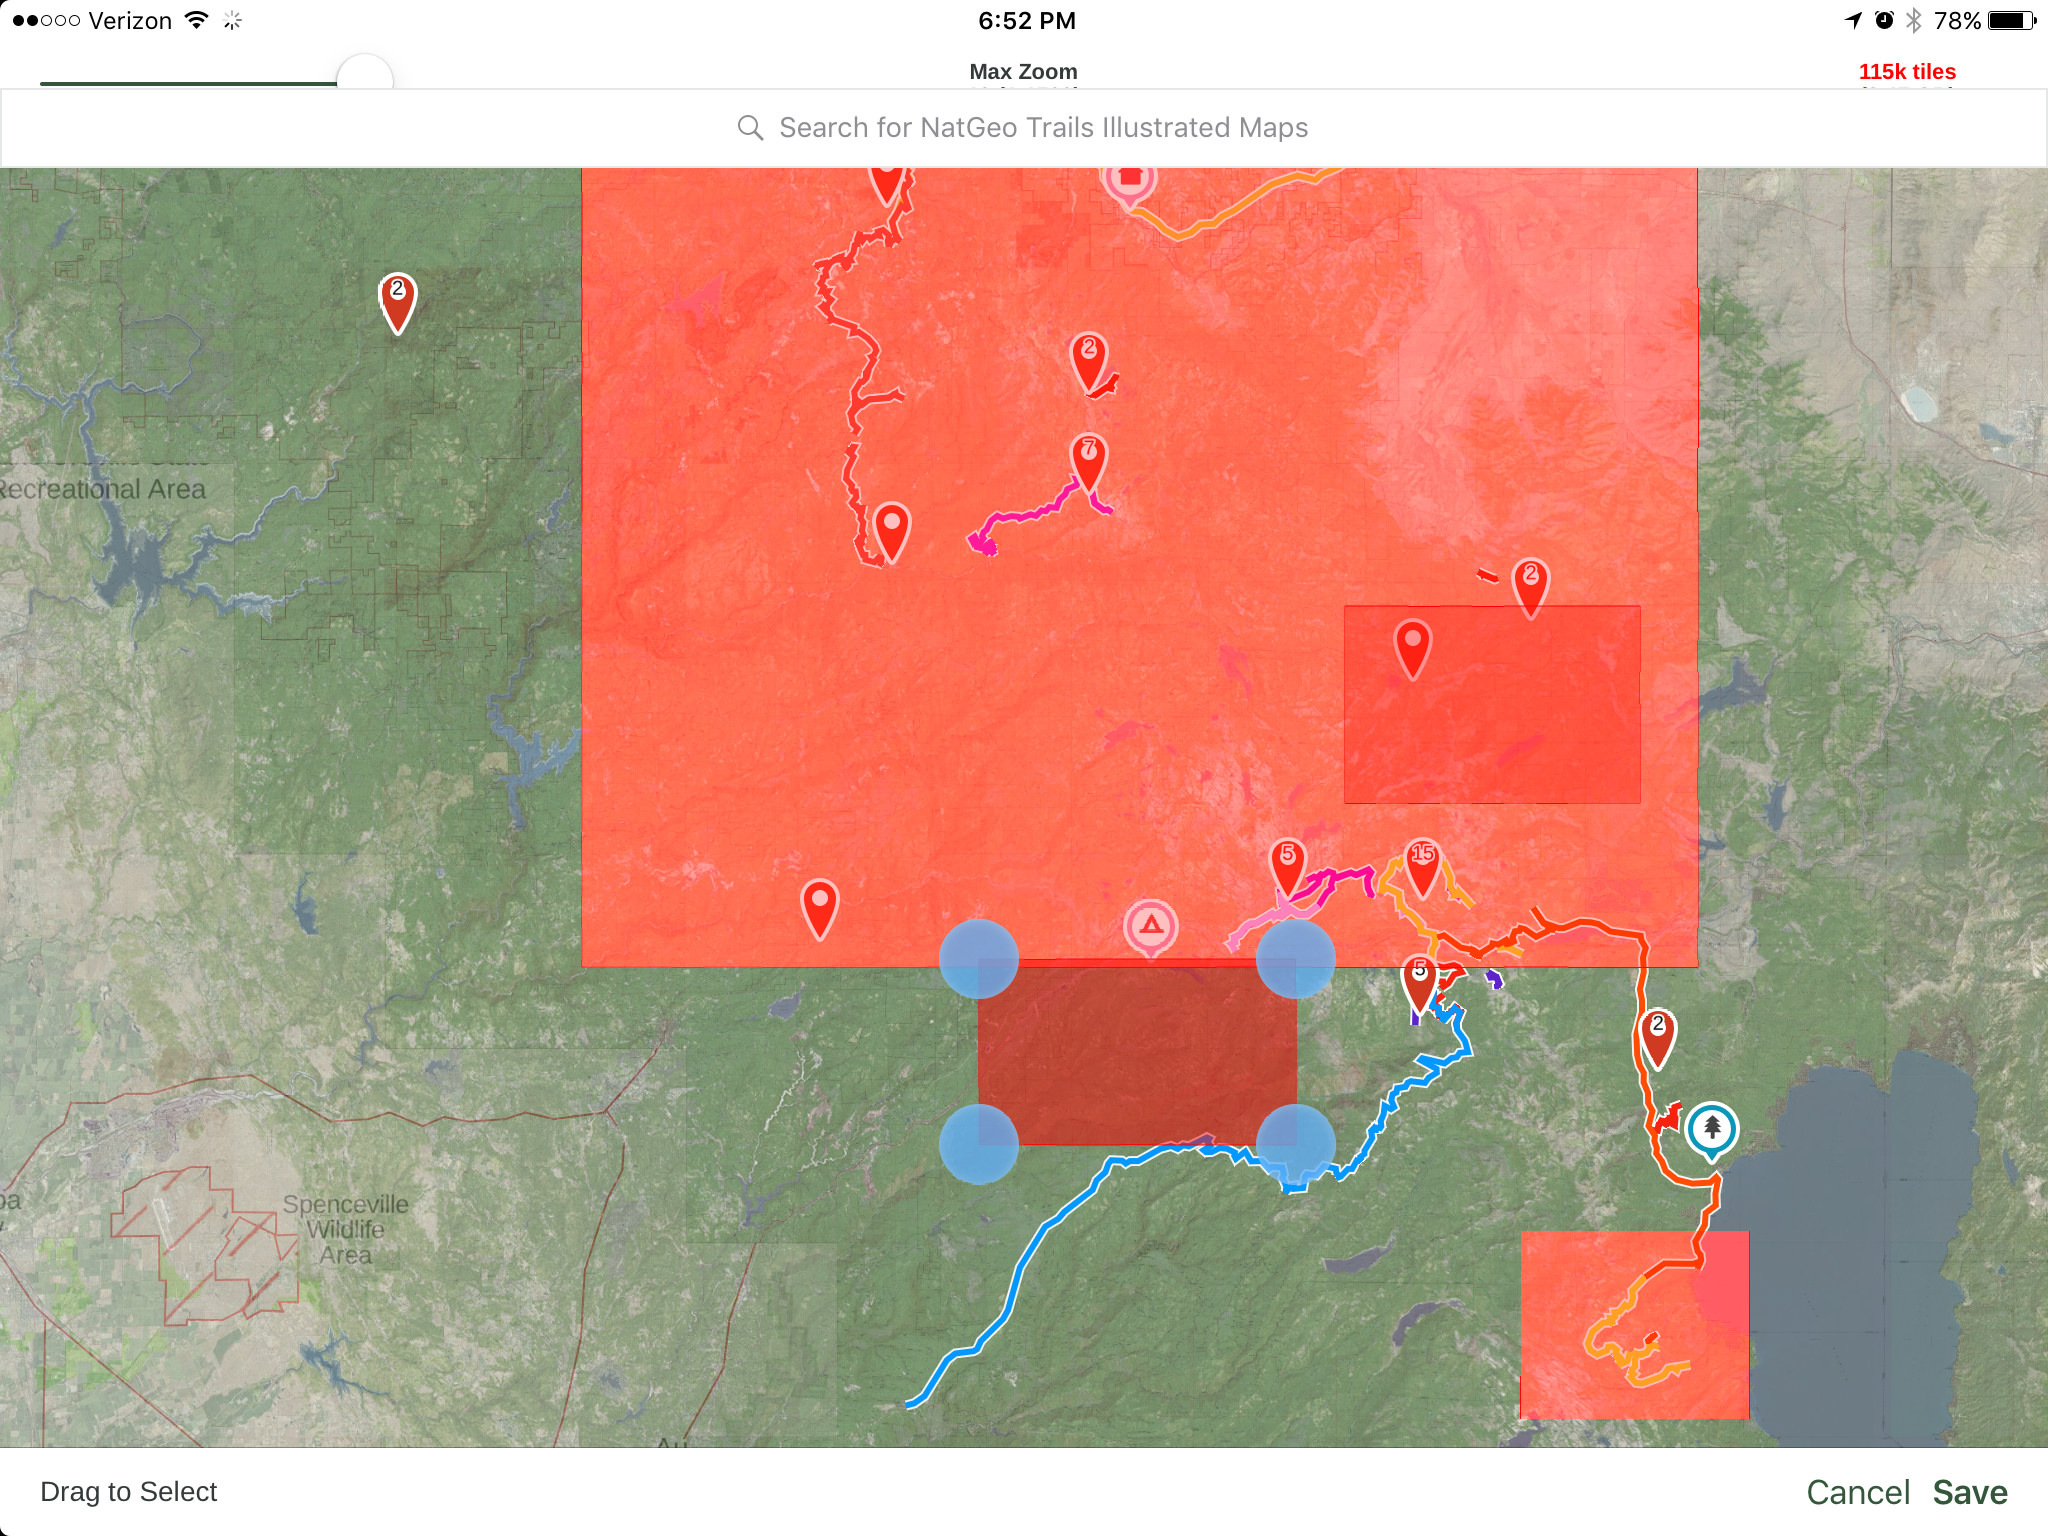
Another tip for creating a route is that when you are done creating the route, you can select “download maps for track” on the route page and it will automatically download an area that is best fit for your route for offline use. This comes in handy when you lose cell signal and want to be able to navigate effectively. Save your route and categorize it in a folder labeled for that area to make it easy to find when you need it. I separate my routes and tracks based on region to make them easier to find when I need them.

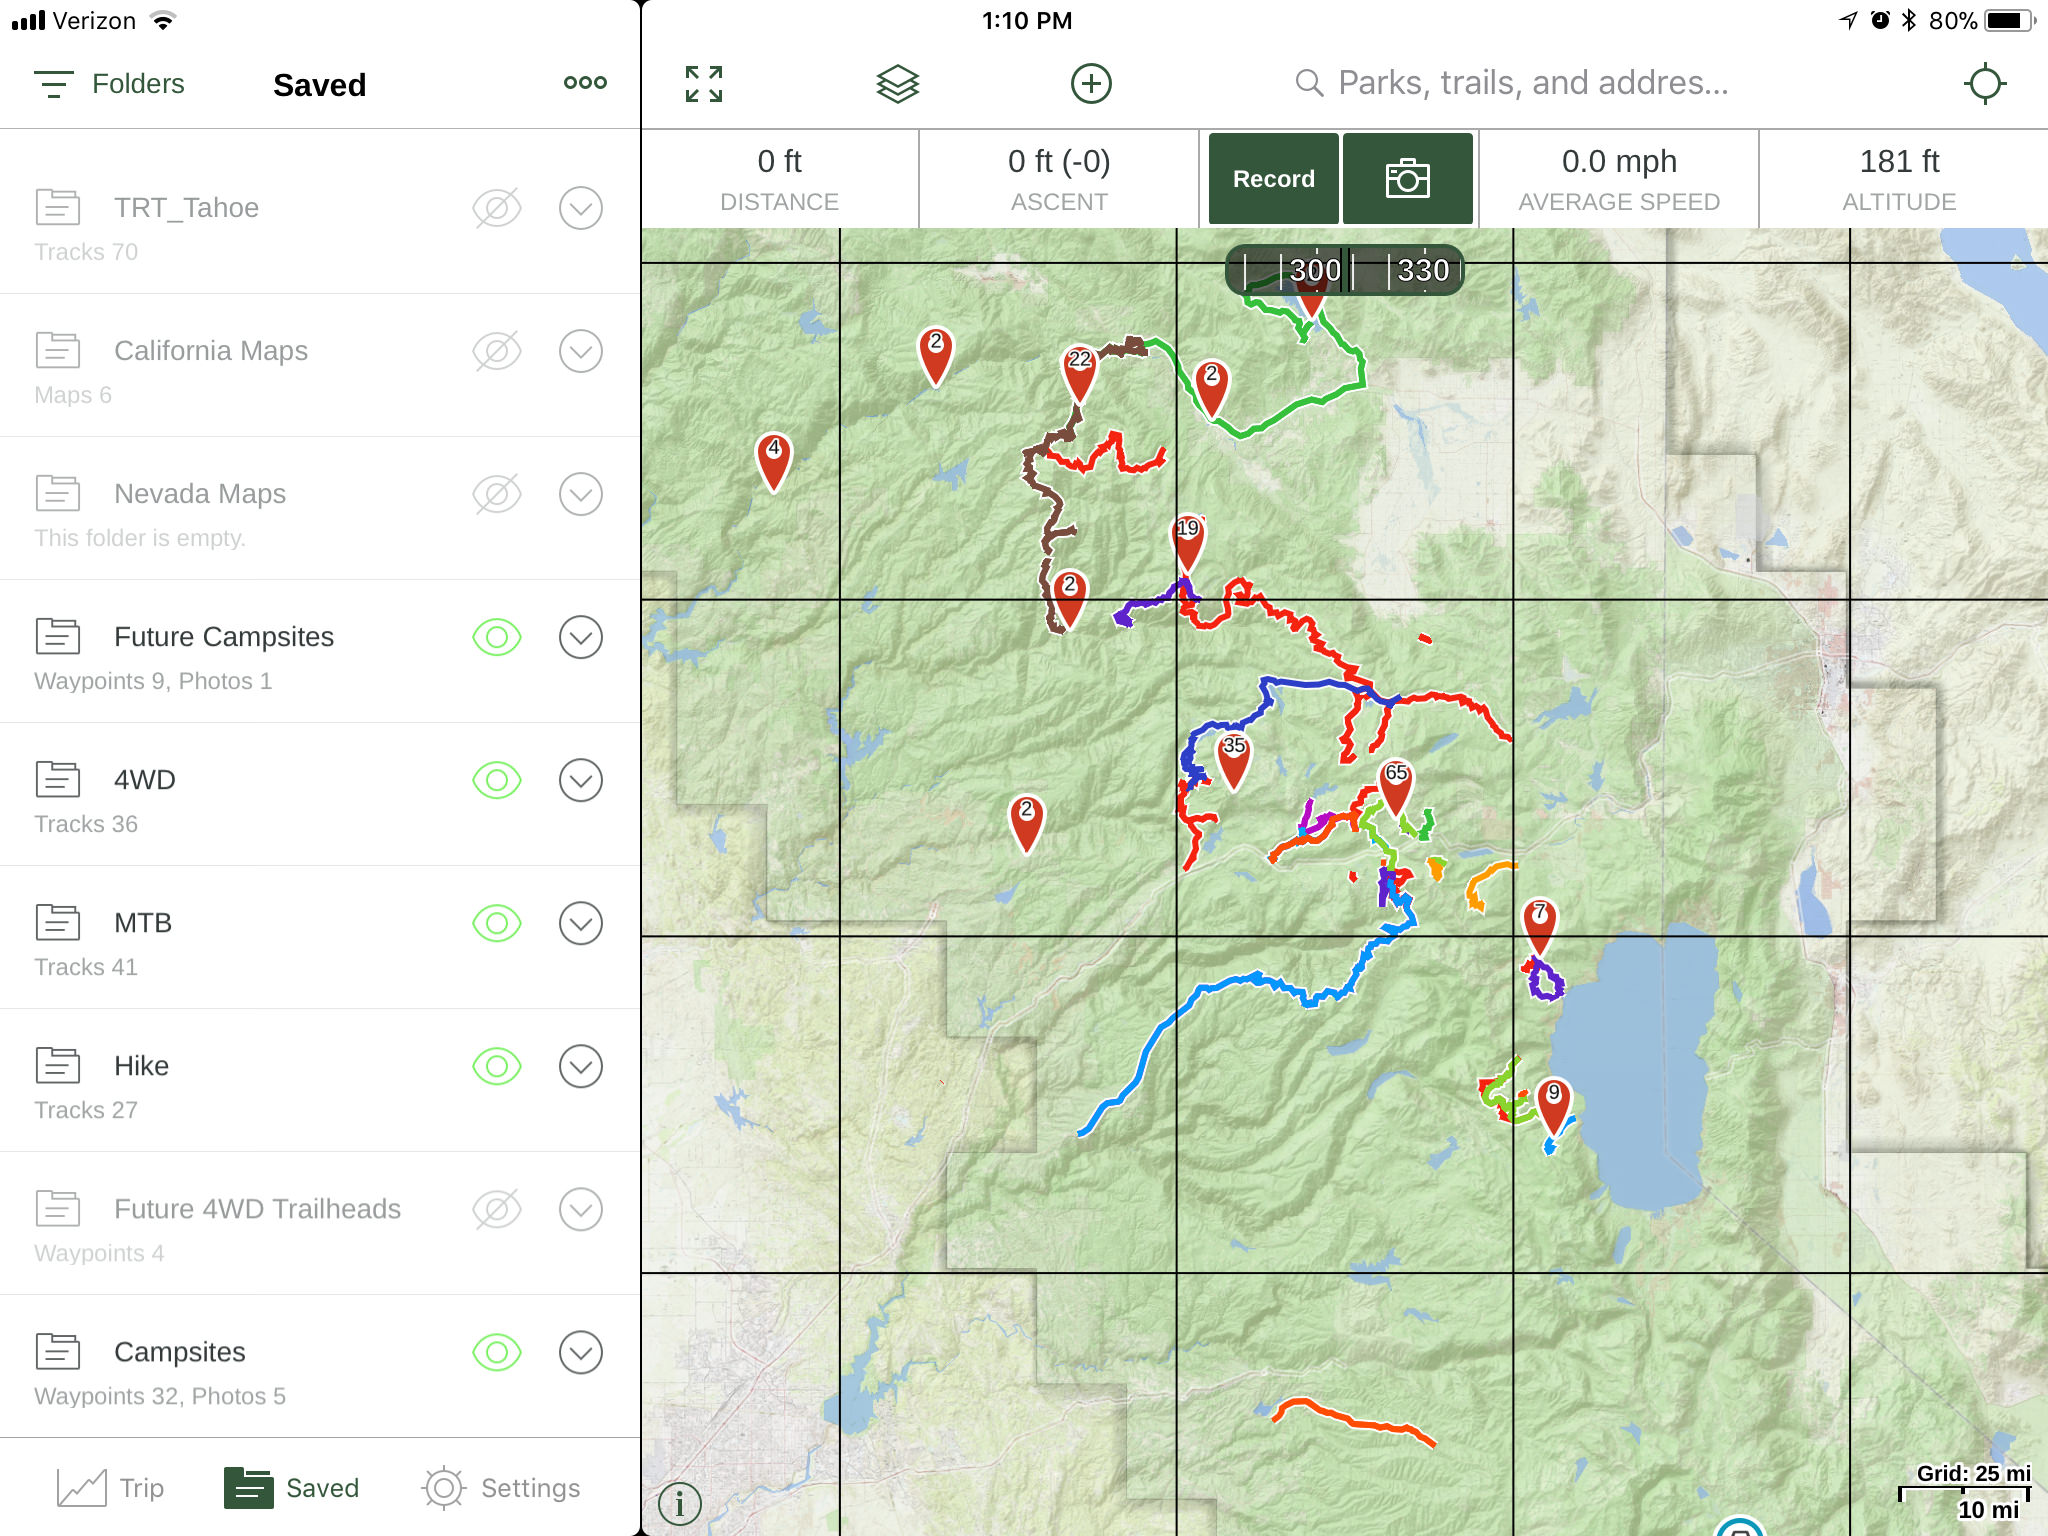
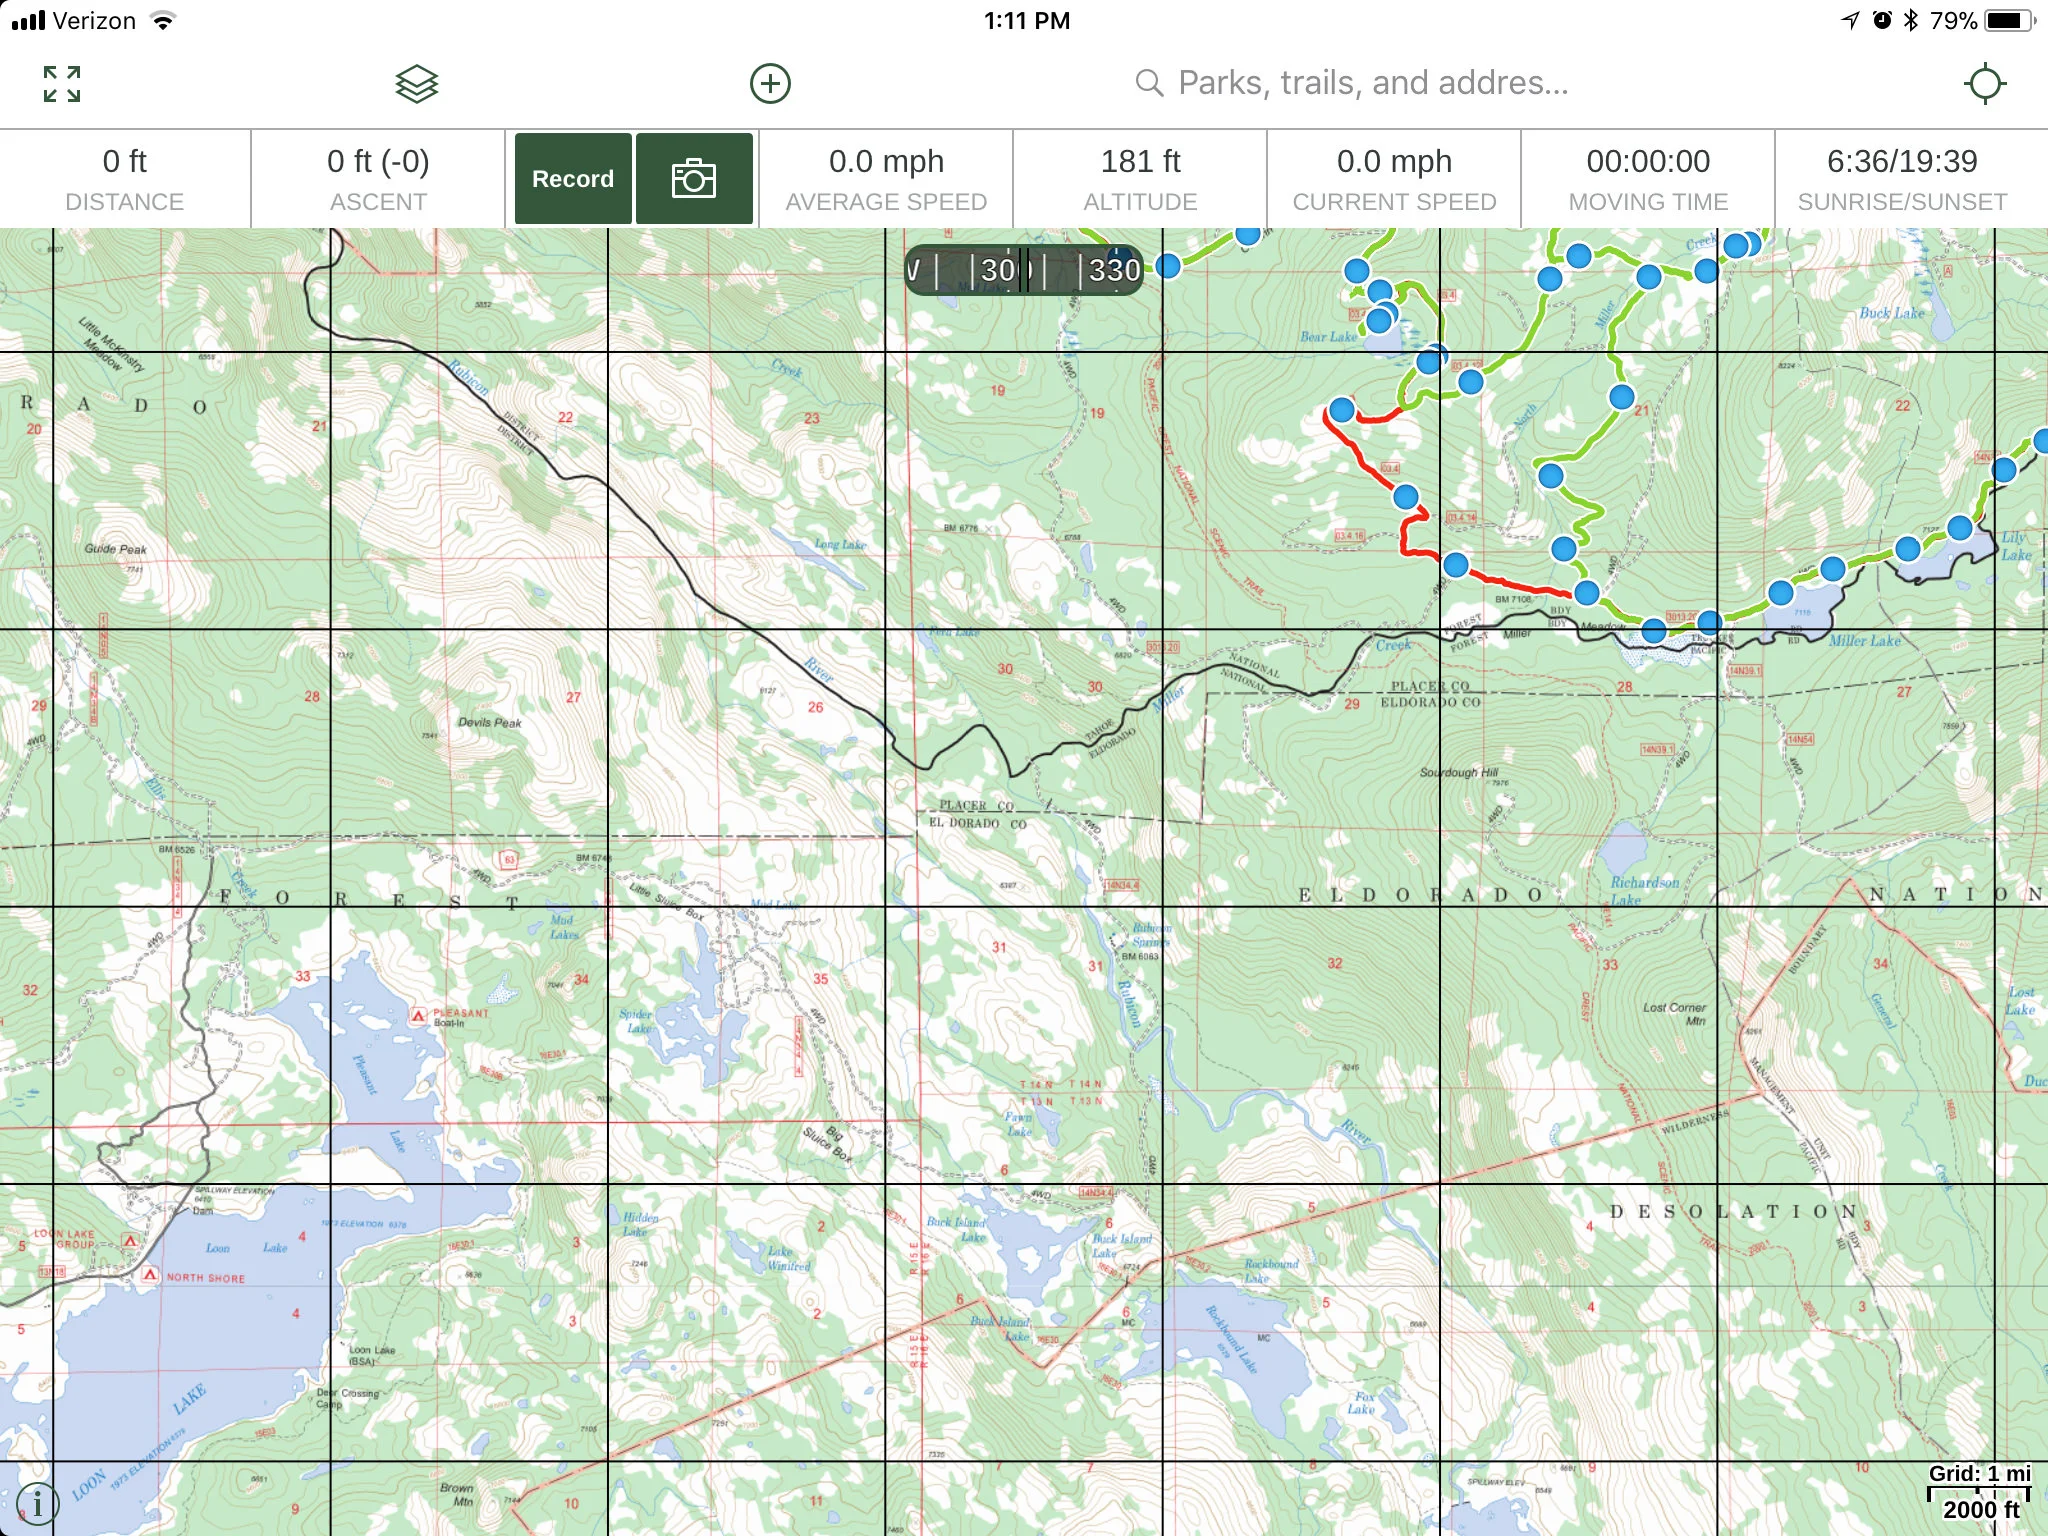
Gaia GPS tracking a hike in the Sierra Nevadas
Tracking your adventure
Being able to follow your tracks or see where you have previously traveled is something that the Gaia GPS app allows you to do by tracking your adventure using your device’s GPS chip (either built in, or third party). This feature is great for people like me to be able to see where I have been, any notes or photos I took along the way (waypoint) and where I have yet to explore of an area. I track everything from 4wd routes, hikes and mountain bike rides, separating each into individual folders to keep things tidy. By separating into folders you also gain the ability to hide different categories from the main map, making it easier to see previous tracks from a specific activity. Along with the tracks themselves, I will also add waypoints to my map along the track to take notes of closed gates, future campsites, hot springs, and anything I find interesting. By doing this I give myself more information for when I come back, or when someone asks me about an area I have been to.
One major tip I have for those using the tracking feature for long distance tracks. At the end of your day of traveling, finish the track and save. Then when you start the next day, you can open up the track and resume it to continue your original track. I was tracking our honeymoon road trip over 3,500 miles and 14 days using one continuous track, just to see if I could. On the last day, I went to save the route and the app glitched. I lost the last 1,000 miles of the track to my frustration and dismay. But that’s technology for you. After contacting Gaia GPS about the issue, they recommended that longer treks either be recorded as separate tracks, or by doing the “finish/resume” routine. I have been doing the latter ever since and I haven’t had a problem with losing data.
Layers
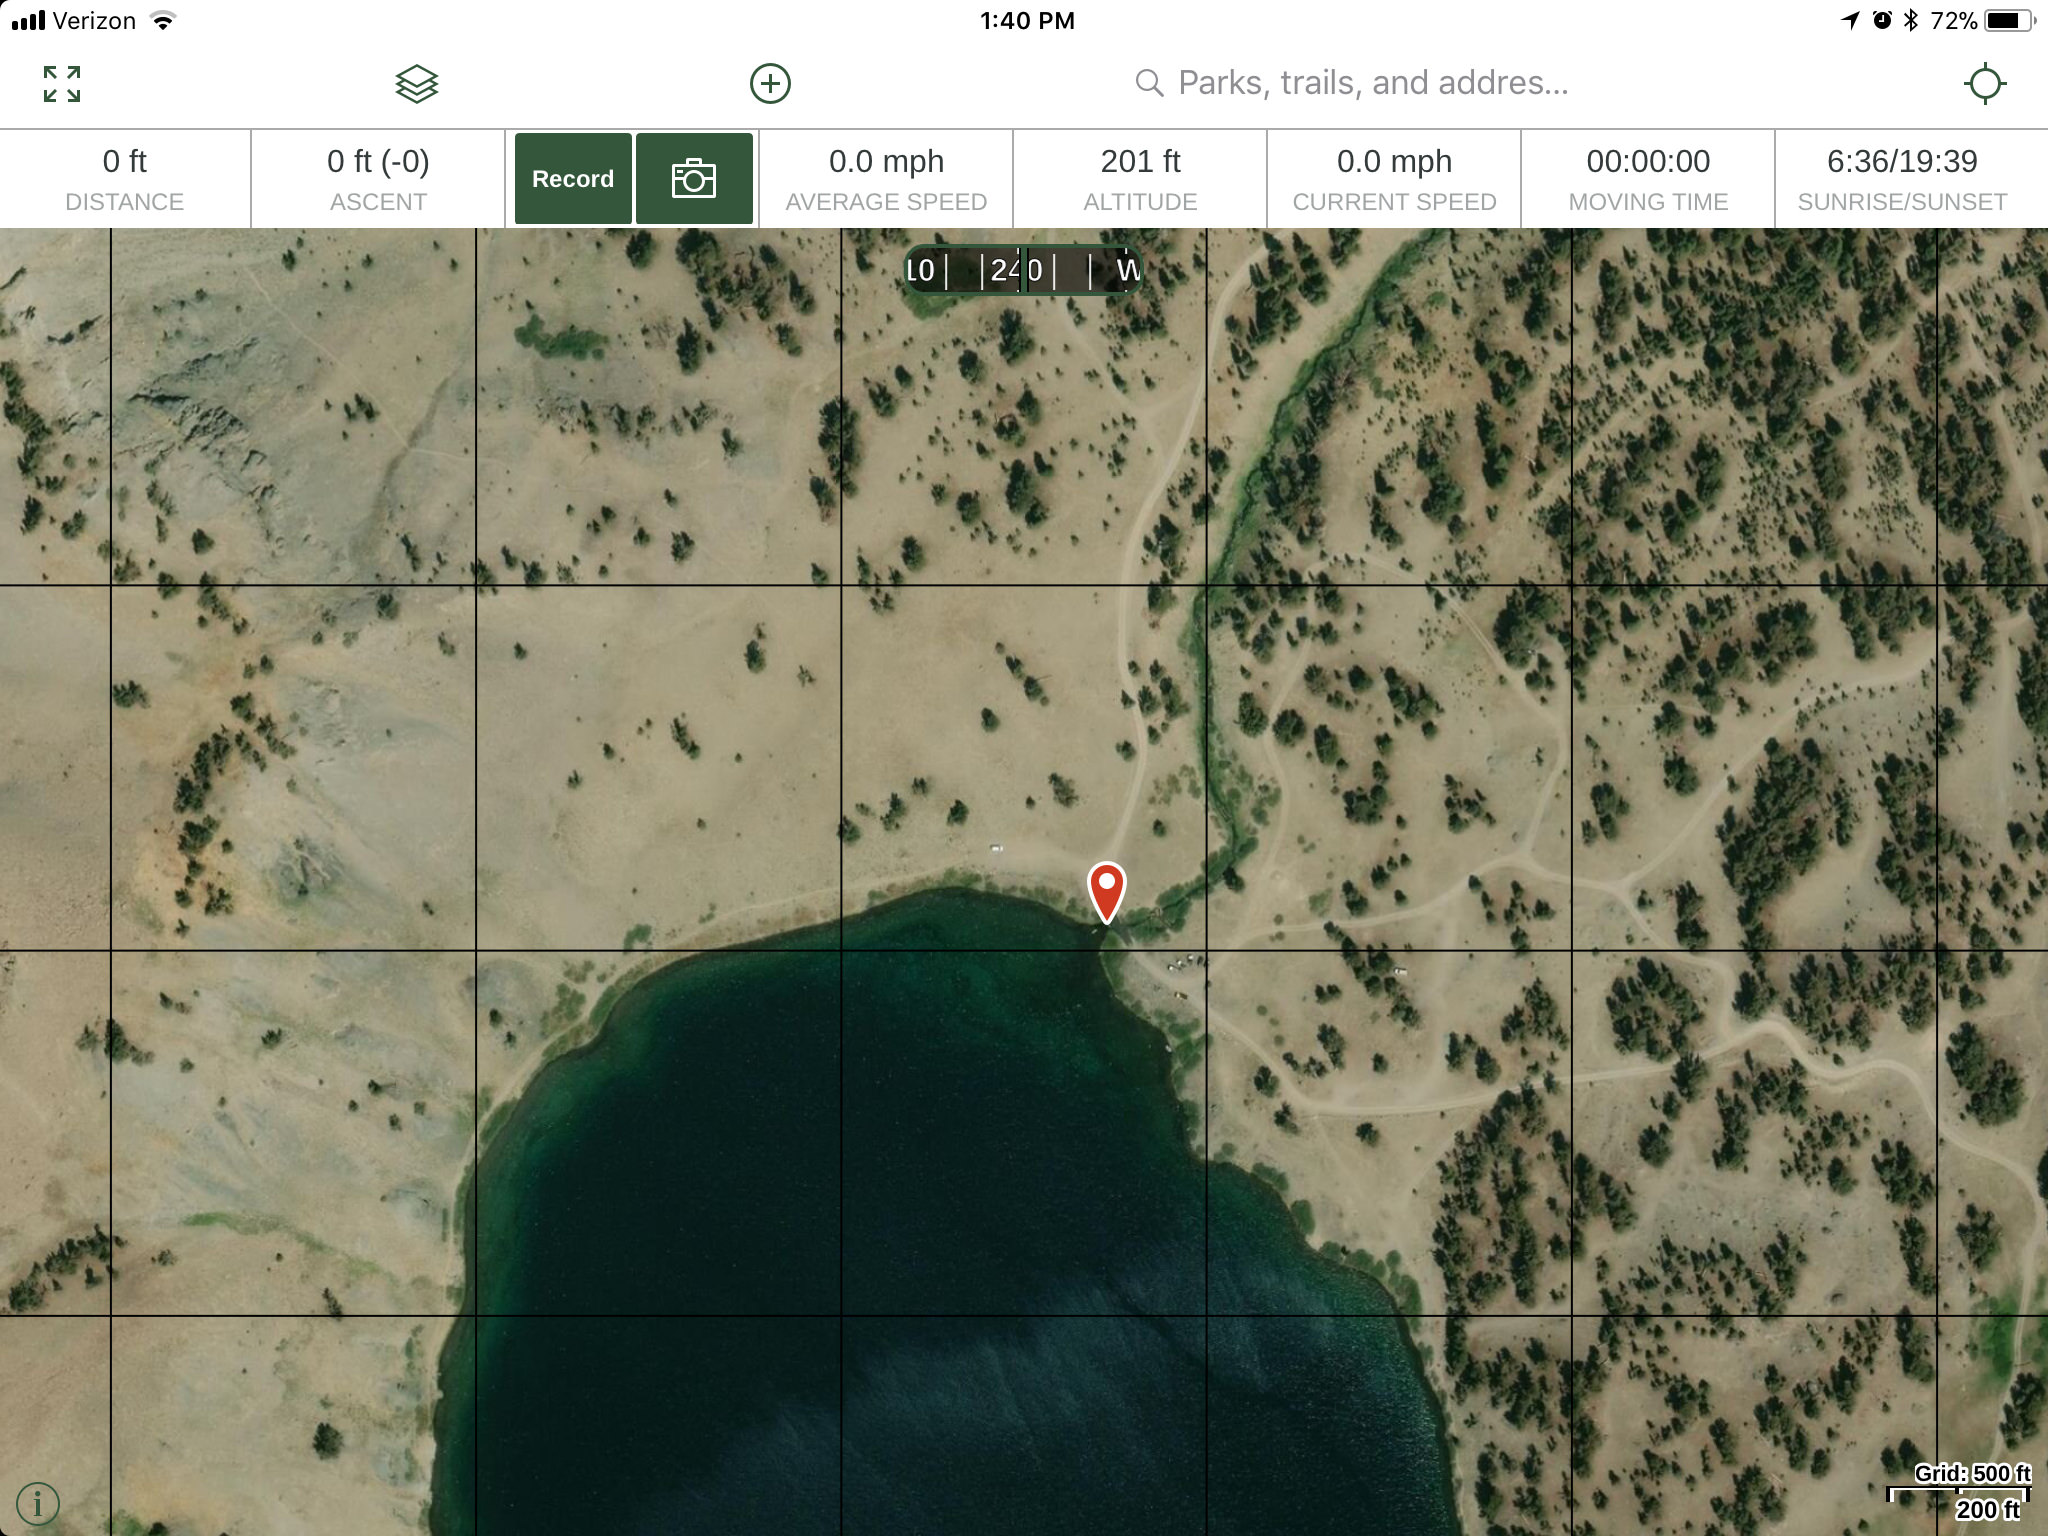
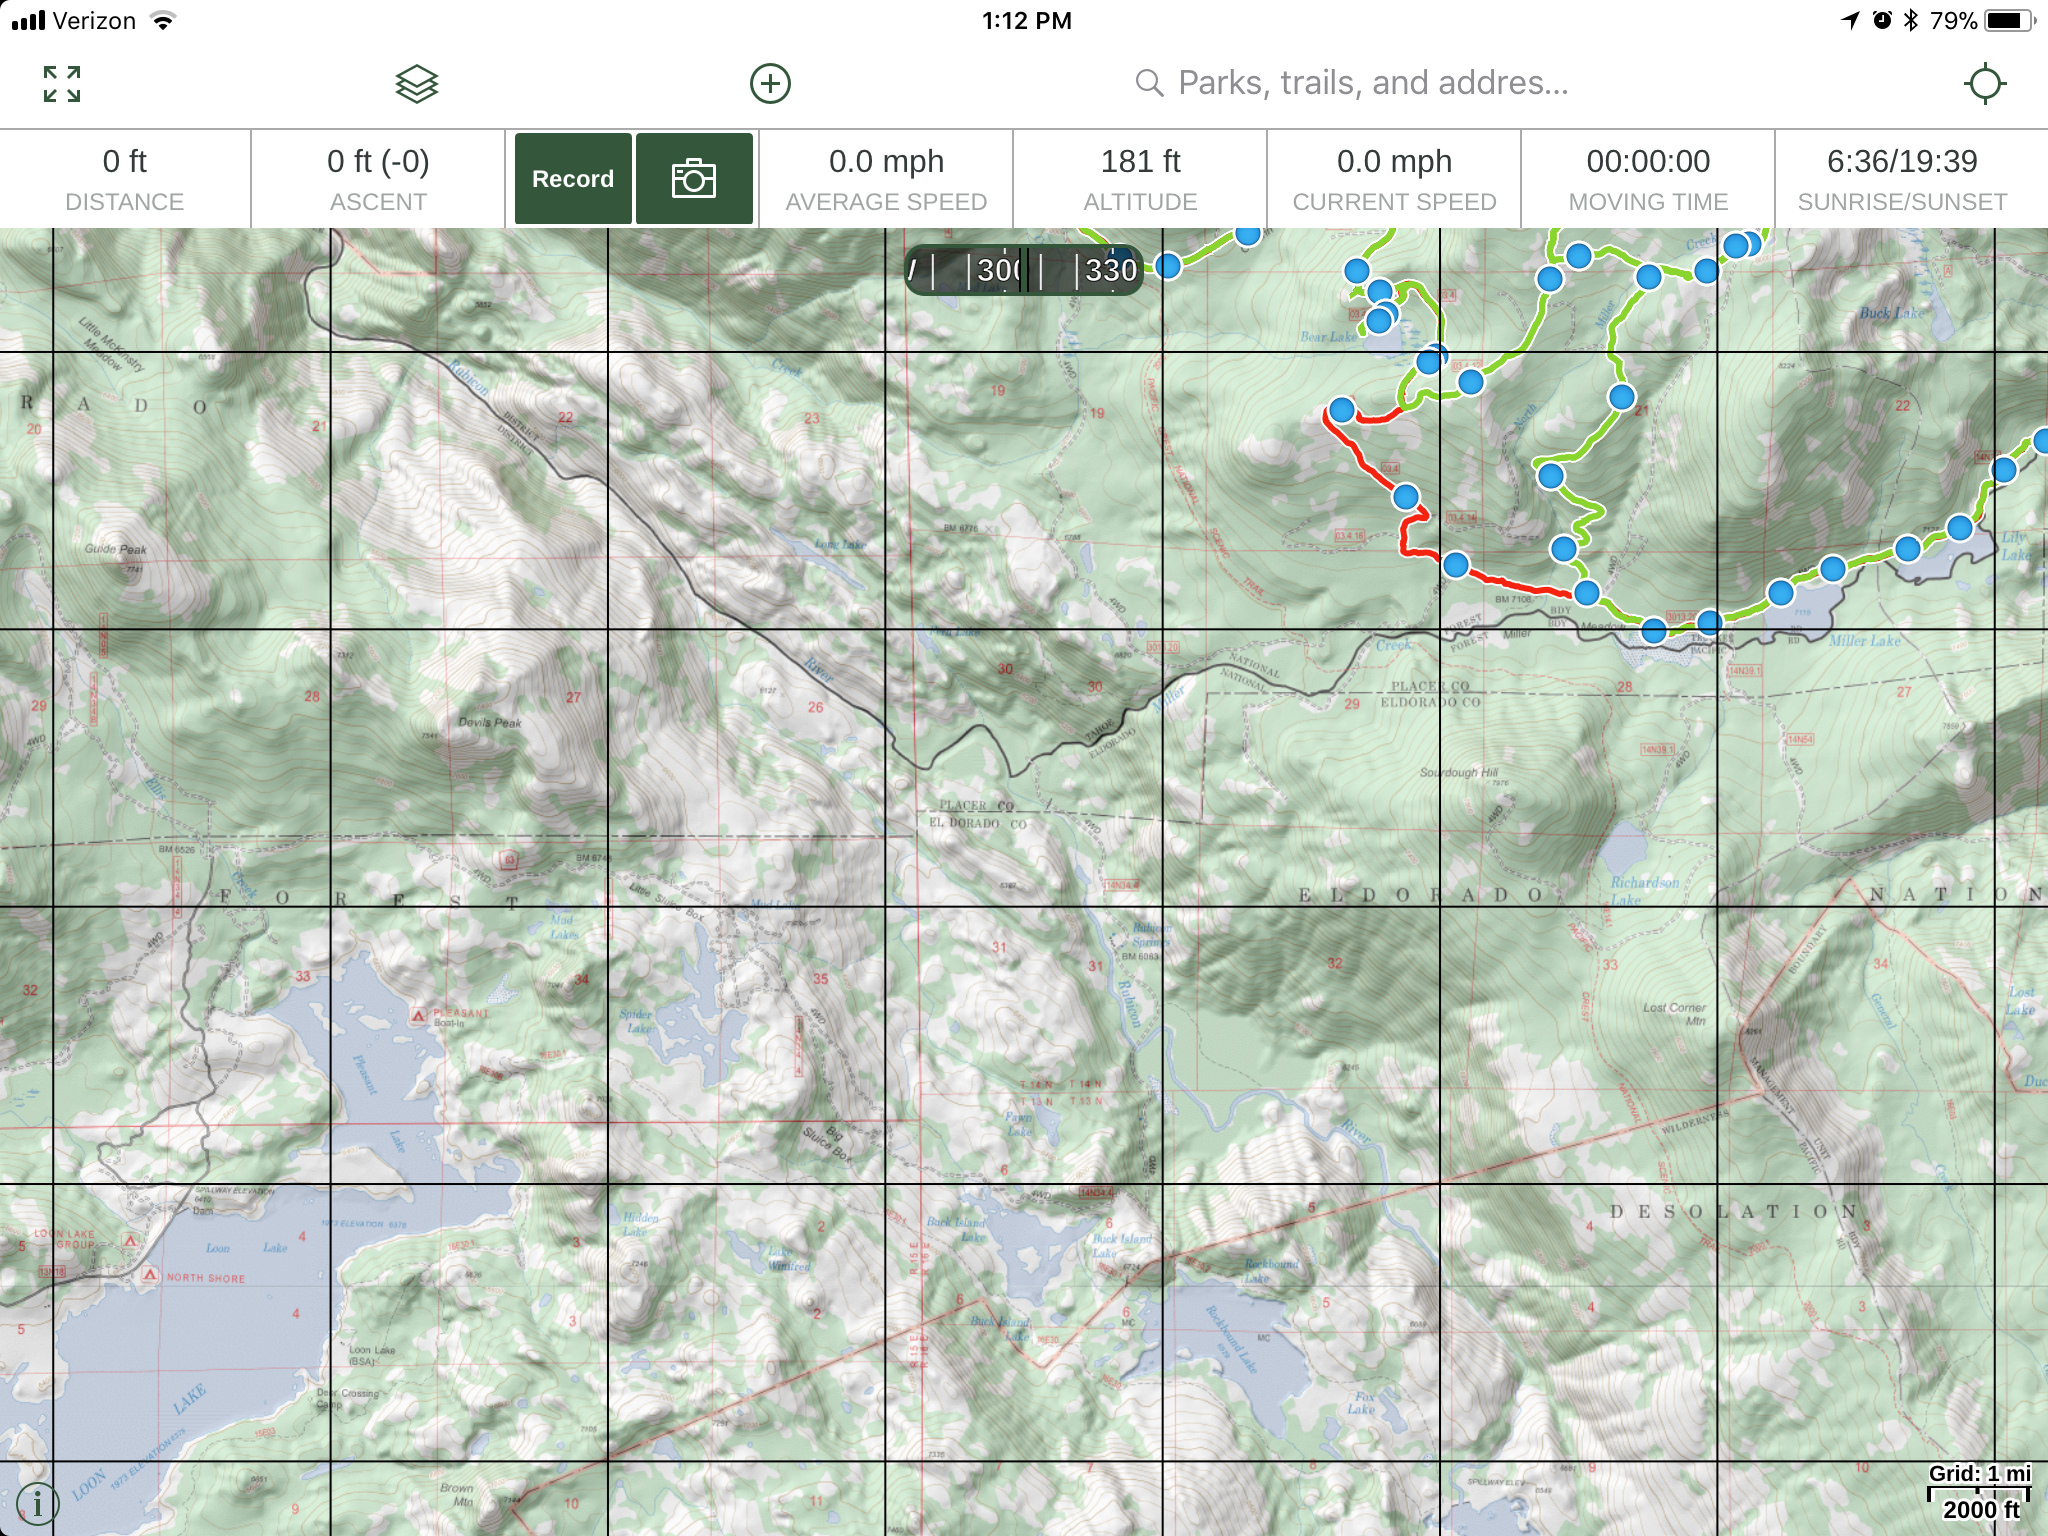
A key benefit to this app among others is the ability to utilize so many different map layers to conform to your trip needs. Personally, I spend a lot of time on National Forest land, making the USFS 2016 layer my best friend. Pair it with the US Shaded Relief layer and you add a lot of depth to the map making navigation and route planning simpler through varying terrain. Similar topographic maps can be accessed to provide valuable feedback in the route planning process, with some areas being better with certain layers than others. This is another great reason to pre-route your trip. You will get a much better idea of which layer will work the best for your target region and you can save it accordingly. If you are travelling in more popular areas of the country, select the tried and true National Geographic Illustrated map layer for great information on points of interest, trails, roads and geographic features. For places like Death Valley, the Nat Geo layer can be very informative and detailed enough for a long weekend in the desert. I personally use the GaiaPro platform which allows me to toggle multiple layers at the same time. This comes in handy when you want to reference a USFS Topo map while searching a satellite layer for a good campsite. This allows you to have a visual on where a clearing might be in relation to the road network around it that might not normally be seen on just a satellite map because of the trees. With all of these layers at your disposal, you will quickly find that you develop a “familiar palette” that you will use most commonly. For me, those are as follows:
USFS 2016 - For all of my National Forest needs
US Shaded Relief - Adds depth and shadowing to enhance topographic features
World Imagery (ESRI) - Great satellite imagery to research your area
US Topo (USGS, GaiaGPS) - Good detailed topo map for non-forest service areas, and (in my opinion) the best layer for creating routes as the routing tool conforms well to it
OpenCycleMap HD - A mountain biker’s friend, showing many trails big and small
Map Box Outdoor HD - I use this for hiking as it shows detailed trail networks
Public Land - This is a good reference to see if you are on public or private land
USFS MVUM - The Motor Vehicle Use Map is a great way to navigate National Forests
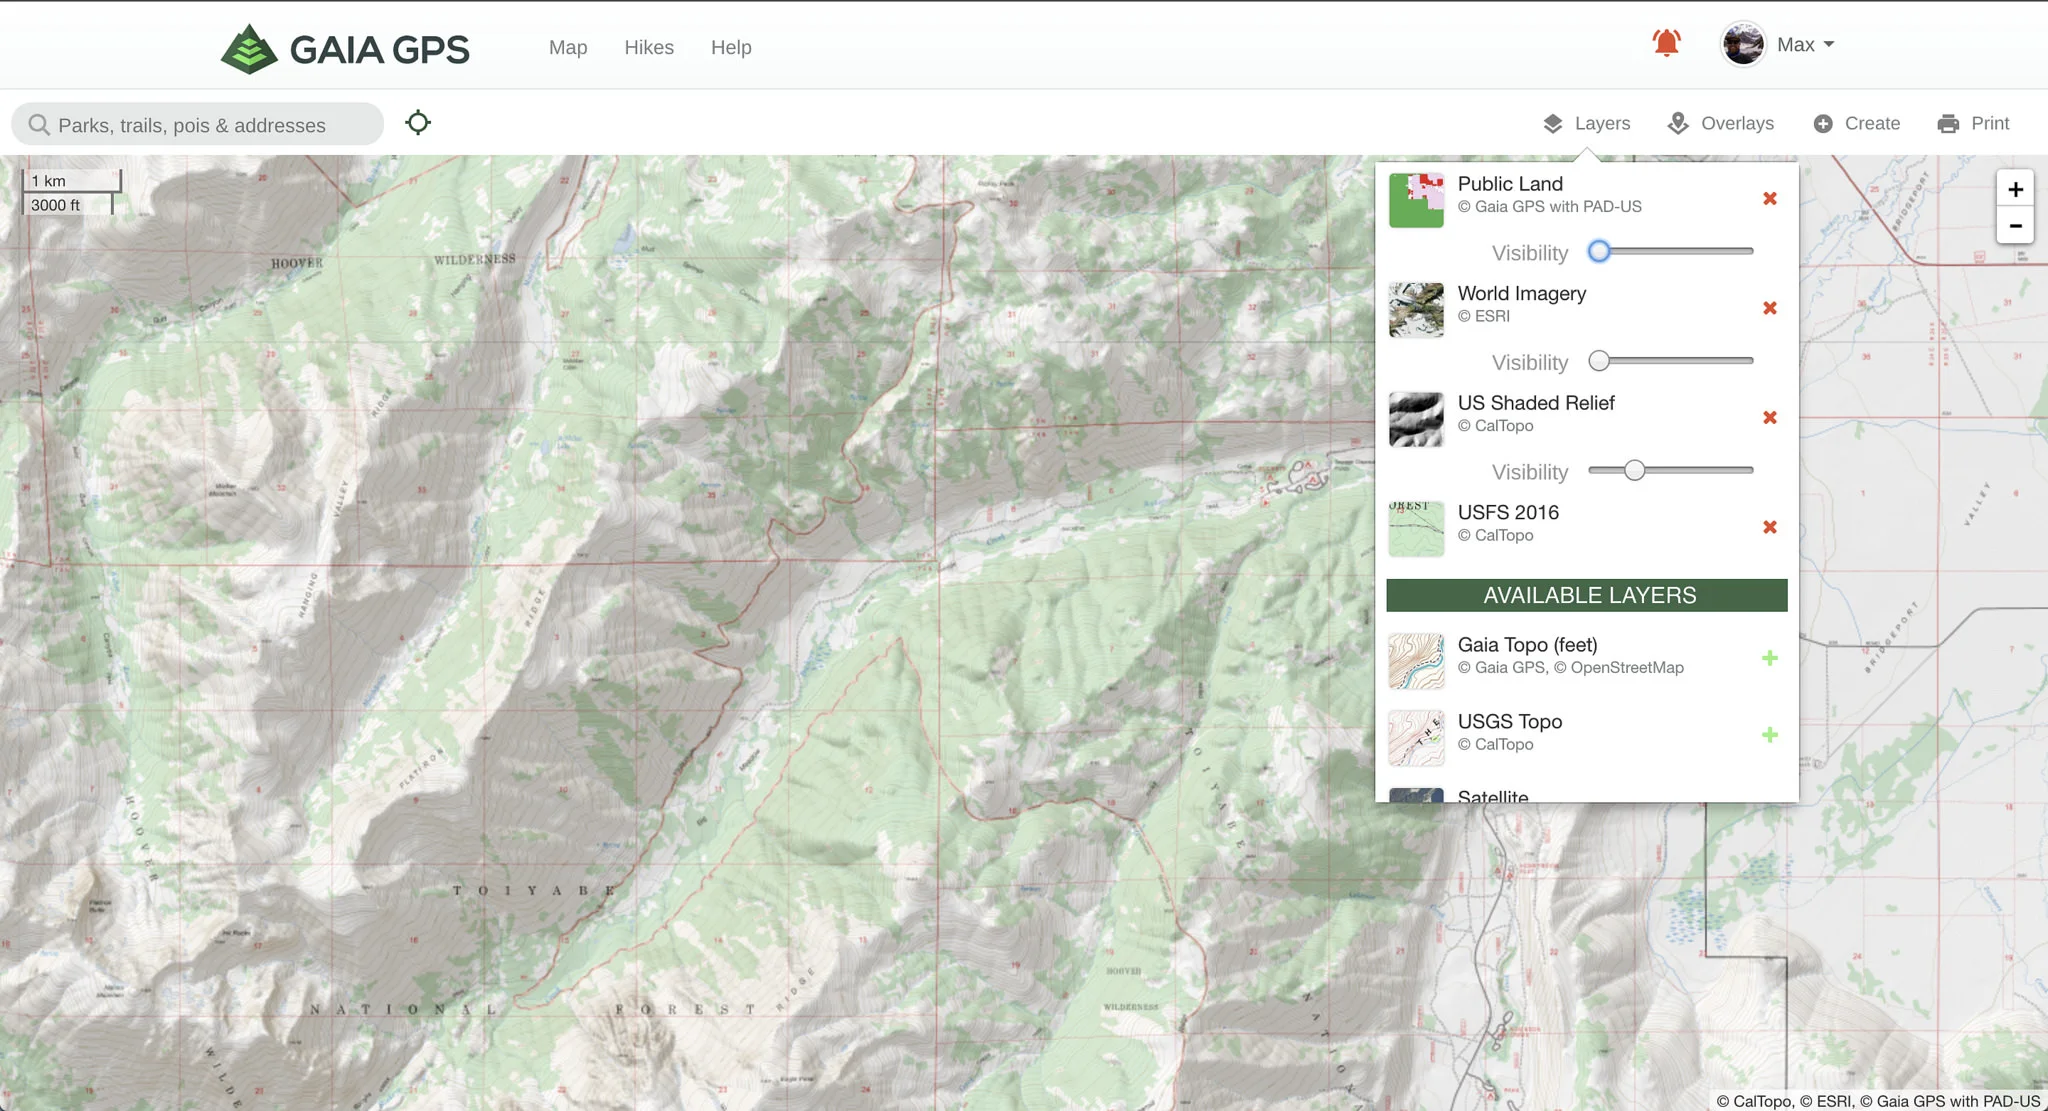
The Layer Manager allows for simple selection of layers, and the transparency of layered maps.
All of these layers come together to help me plan my trips, and once I am where I want to be, explore the area. But remember, explore your area before you leave for the weekend so you can have a full understanding of which layers work best where you are going, and what maps you’ll need to download to keep your trip going!
Other random tidbits
There are other fun and useful features that the Gaia app offers that I use frequently on trips:
There is a feature to take and waypoint photos along your track. See a gate blocking your road? Trail conditions that you want to remember the next time through? Take a photo and revisit it before your next time out to make sure that you are prepared or that the other vehicles that you might have with you are capable of the trip you have planned.

Share that favorite spot with good people
Use the app to share tracks with your friends or fellow adventurers. I commonly will share tracks or waypoints with friends that I know will enjoy and respect the places that I have been. Especially when they are just looking for a place to get away for the weekend and I may not be around to show them the way myself. It’s very helpful for them because it can give them information such as total distance, drive time, altitude gain and descent as well as any waypoints I have marked on the way so that they can plant their trip accordingly. Knowledge is power. In this case, the power to get out and have a great time outdoors.
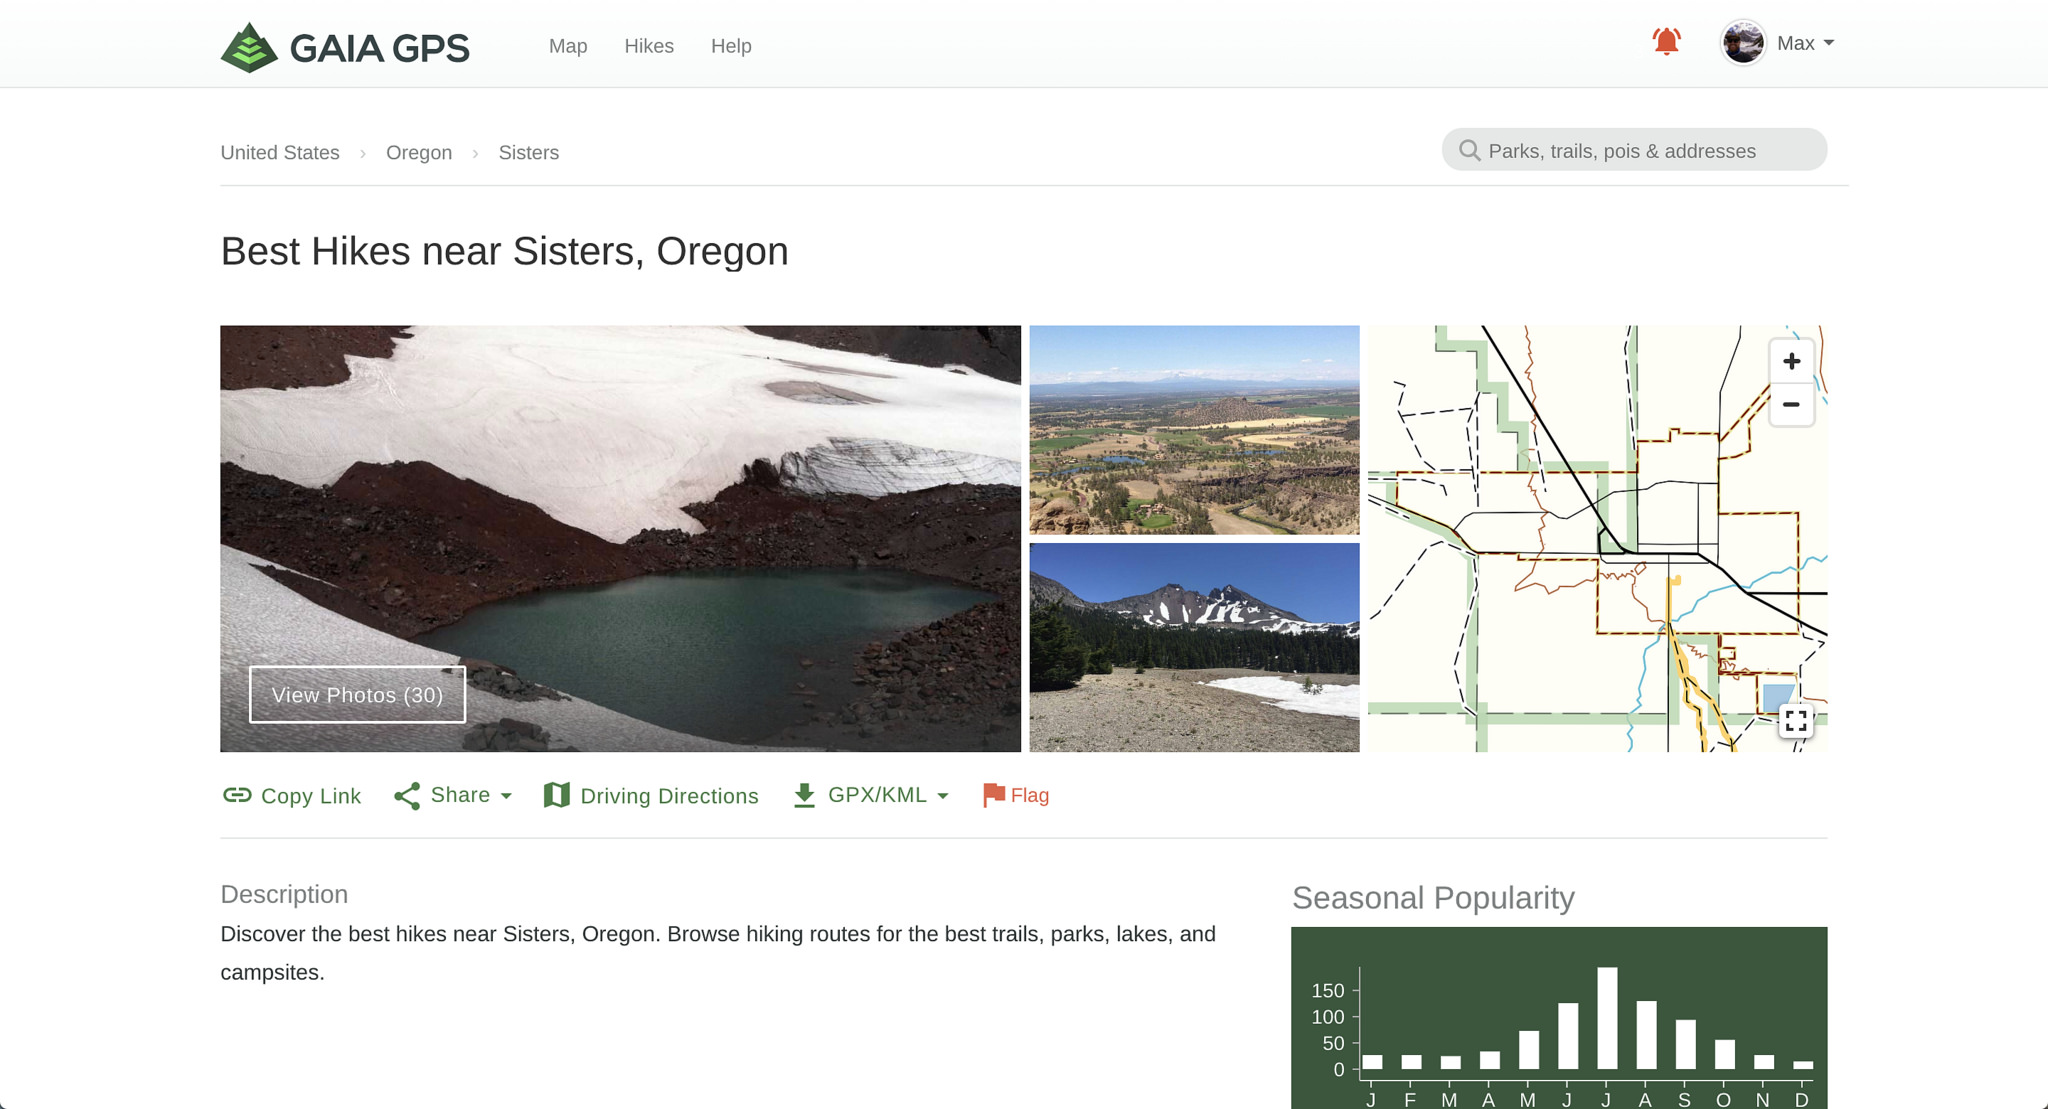
A new feature with the Gaia app is the ability to find new hikes and tracks that have been made public by others. Now, I have not had a lot of opportunity to try out this newer feature, but I will update this post with more information after I have had the time to get to know it myself.
Membership information

The National Geographic layer showing Death Valley. Available with the Gaia GPS Premium membership.
Gaia GPS is a membership based service, as many other apps of the like are. You can use the app for free, but you are very limited in what you can do. It’s a great way to experience a small portion of the offerings before purchasing, but for someone who really wants to use the app for what it’s capable of, a paid membership is a much better option. Starting at $19.99/yr you can utilize the member level options which will allow you to use many of the available layers as well as download maps for offline use, a must for off-the-grid traveling. Upgrading to the Premium membership ($39.99/yr) opens up all that Gaia has to offer including all of Gaia’s available map layers along with the ability to overlay those layers on one another to combine the best of multiple layers on one screen. For more information on the specific differences and pricing, click here!
Prices too steep? On the fence about purchasing?
Click here for special Explore4R pricing on membership subscriptions!
For someone who is experienced in the world of off-road travel or someone who is just getting into it Gaia GPS has a lot to offer when it comes to navigation. I wouldn’t have been able to find a good number of my favorite campsites without using the tools that the app has to offer. Beyond that, I wouldn’t have been able to log and categorize the places I have been. This has been a consistent go to for all of my long and short trips and I will continue to use it for adventures to come.
Have questions? Want more detailed feedback on the app, or questions of how to use it? Feel free to send me an email.
